Most homeowners fear a catastrophic pipe burst, but the real financial threat—often denied by insurance—comes from the slow, silent leaks a $50 sensor is designed to catch.
- Slow leaks lead to structural rot and expensive mold remediation not typically covered under “gradual damage” policy exclusions.
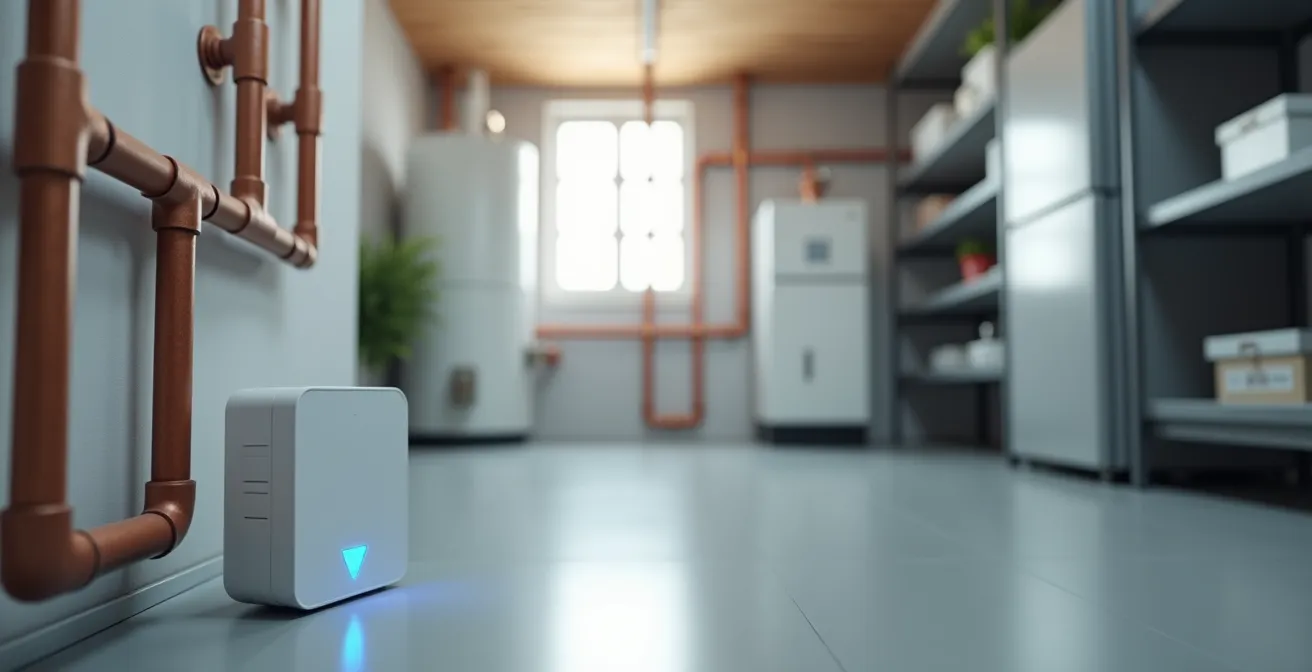
- A system of smart sensors, especially reliable Z-Wave models for basements, provides early detection before damage becomes structural.
Recommendation: Start by placing a few sensors in high-risk areas (sinks, water heaters) and immediately contact your insurance agent to ask about specific discounts for leak detection systems.
As a property insurance adjuster, I’ve walked through hundreds of water-damaged homes. The most memorable cases aren’t the dramatic basement floods from a burst pipe. They’re the silent disasters, the ones that unfold drip by drip over months. A homeowner returns from vacation to find their kitchen floor buckled and a black tide of mold creeping up the drywall, all from a pinhole leak in a dishwasher line. This is the risk most people don’t see. We’re conditioned to fear the sudden catastrophe, but the real financial poison is the slow, corrosive leak—the kind your insurance policy may call “gradual damage” and refuse to cover.
The common advice is to “check your appliances,” but that’s a strategy based on guesswork. The reality is that modern, affordable technology has transformed water damage prevention from a passive hope to an active, data-driven strategy. The industry has seen that home water damage affects an estimated 14,000 people every day, turning a small investment into a critical financial shield. This isn’t about buying a neat gadget; it’s about deploying a strategic financial instrument to protect your single largest asset from its most insidious threat.
This guide moves beyond the basics. We’ll dissect why slow leaks are a greater financial threat than blowouts, how to create a reliable detection network even in the most challenging areas of your home, and how to leverage this technology not just for protection, but for tangible financial returns through insurance discounts and smarter home maintenance. It’s time to stop worrying about water damage and start managing it with precision.
This article provides a complete roadmap, from understanding the hidden risks to implementing a full-scale prevention system. Here’s a look at the critical points we will cover.
Summary: A Pragmatic Guide to Eliminating Home Water Risk
- Why a Pinpoint Leak Can Cost More Than a Burst Pipe Over Time?
- How to Install Water Sensors Under Sinks Without Professional Help?
- WiFi vs Z-Wave: Which Sensor Protocol Penetrates Basements Better?
- The Insurance Discount for IoT Leak Detectors Most Owners Miss
- How to Link Your Sensor to an Automatic Water Main Shut-Off Valve?
- How to Predict Washing Machine Failure Before It Floods Your Floor?
- Repair or Replace: What the Data Says About Appliances Over 7 Years Old?
- Home Care vs Nursing Home: How to Make the Right Choice for Mom?
Why a Pinpoint Leak Can Cost More Than a Burst Pipe Over Time?
The image of a basement filling with water from a burst pipe is terrifying, but from a financial standpoint, it’s often the more manageable scenario. The damage is immediate, obvious, and typically falls under the “sudden and accidental” clause of most homeowner’s insurance policies. The real financial trap is the slow, unnoticed drip. A leak of just one drop per second from a worn-out faucet washer or a loose fitting can waste over 3,000 gallons per year. When it’s hidden behind a wall or under an appliance, this minor issue becomes a long-term corrosive force. Over weeks and months, that moisture saturates drywall, subflooring, and structural beams, creating the perfect environment for toxic mold to flourish.
This is the critical distinction: a burst pipe causes water damage; a slow leak causes structural rot and mold contamination. When an adjuster finds long-term moisture, rot, and mold, the claim often gets denied under the “gradual damage” or “maintenance issue” exclusion. You, the homeowner, are now facing a five-figure bill for remediation and repair that your policy won’t touch. In fact, according to EPA data, hidden household leaks can waste up to 10,000 gallons of water annually, all while silently destroying your property’s value from the inside out.
This comparative analysis breaks down the true financial impact, revealing why the unseen threat is the most dangerous. The initial repair for a burst pipe is often the end of the story, whereas the discovery of a slow leak is just the beginning of a costly and complex problem.
| Damage Type | Burst Pipe (Immediate) | Slow Leak (12 Months) |
|---|---|---|
| Initial Detection | Immediate – catastrophic flooding | Hidden for months – often unnoticed |
| Water Damage | $3,000-$5,000 (acute) | $11,000+ (structural rot) |
| Mold Remediation | Minimal if dried quickly | $15,000-$30,000 |
| Insurance Coverage | Usually covered (sudden/accidental) | Often denied (gradual damage) |
| Property Value Impact | Minimal after repair | Must disclose, reduces value 5-10% |
| Total Average Cost | $5,000-$8,000 | $25,000-$50,000+ |
A $50 sensor completely flips this script. It turns an invisible, long-term risk into an immediate, actionable notification, effectively converting a potentially non-insurable “gradual” event into a “sudden” one from the moment of detection.
How to Install Water Sensors Under Sinks Without Professional Help?
The first line of defense in your water risk strategy is the simplest. Placing sensors in high-risk areas doesn’t require an electrician or a plumber; it requires strategic thinking. The goal is not just to place the sensor, but to position it to detect the very first drop of water before it has a chance to spread. The most common failure points are under sinks, behind toilets, and next to water heaters and washing machines. These are your non-negotiable locations.
However, simple placement isn’t enough. You need to think like water. Where will it pool first? Often, this is in a low spot or against the back wall of a cabinet. A brilliant pro-tip is to create a ‘leak trap’ by placing the sensor inside a shallow plastic container lid. This simple trick contains the first few drips directly under the sensor, ensuring an immediate trigger rather than waiting for water to spread across a larger surface area. This is especially crucial for detecting the slow, intermittent drips that are the most insidious.
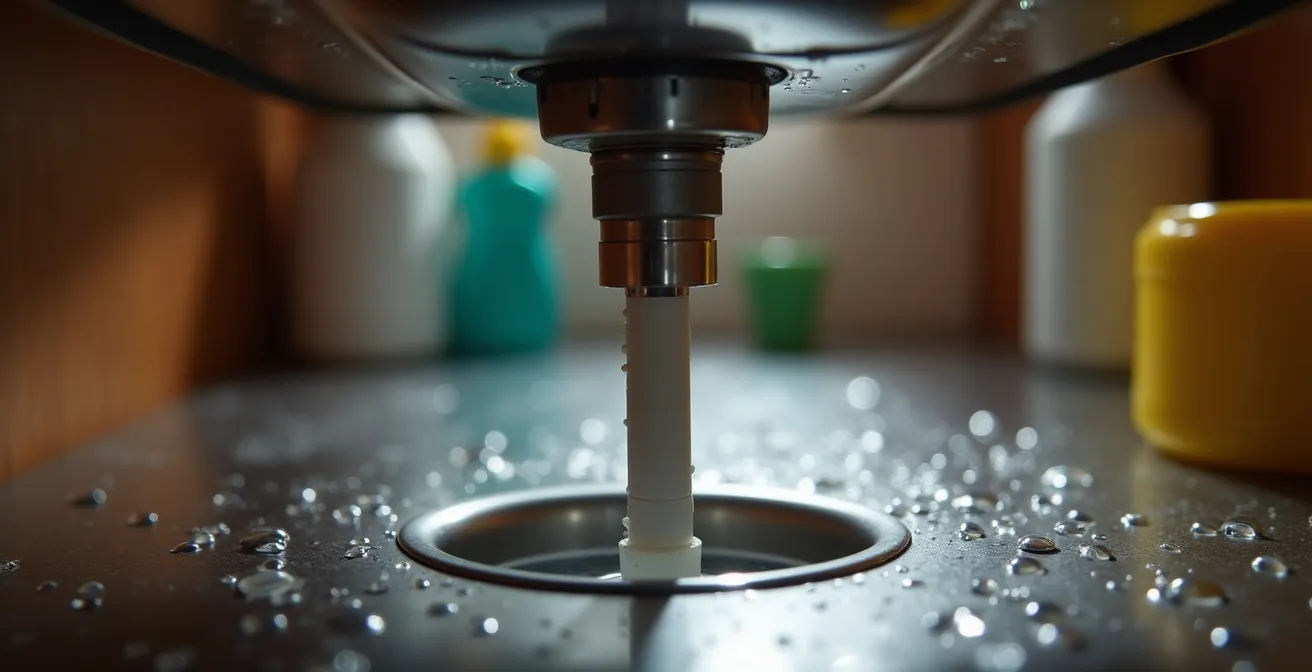
As this detailed view shows, the ideal placement is directly under the P-trap or main connections, where gravity will guide any leak. Once placed, you must test your system. Use a dropper to place a small amount of water on the sensor; you should receive an alert on your phone within seconds. This confirms not only that the sensor works but that your entire notification chain is active. Finally, be mindful of false alarms by keeping sensors away from areas prone to normal condensation or splashing.
A well-placed sensor is the most cost-effective home monitoring tool you can own, providing a level of vigilance that is impossible to achieve manually.
WiFi vs Z-Wave: Which Sensor Protocol Penetrates Basements Better?
Once you decide to deploy sensors, the next critical choice is the communication technology. It’s a decision that directly impacts the reliability of your entire system. The two main contenders are standard Wi-Fi and low-power mesh networks like Z-Wave or Zigbee. While Wi-Fi seems like the simplest choice because it uses your existing home network, it has two significant drawbacks for this specific application: high power consumption and poor signal penetration through dense materials.
A Wi-Fi sensor is constantly communicating with your router, draining its battery in months. More importantly, Wi-Fi signals struggle to reliably reach the very places you need sensors most: deep in a basement, behind a metal washing machine, or inside a utility closet. A sensor that can’t communicate is worse than no sensor at all. This is where Z-Wave and other mesh protocols excel. Instead of each sensor connecting directly to a central hub, they connect to each other, forming a resilient “mesh.” Each device acts as a signal repeater, strengthening the network and extending its reach. If one path is blocked, the signal simply finds another route.
This mesh architecture is a game-changer for reliability in challenging environments. A facilities management study found that in corporate buildings with concrete walls and complex layouts, Z-Wave networks maintained robust connectivity where Wi-Fi failed. Furthermore, extensive protocol testing demonstrates that battery life can reach 2-5 years for Z-Wave vs 6-12 months for Wi-Fi. This longevity and reliability make it the clear professional choice for a “set it and forget it” system you can actually trust.
For a critical safety system, choosing the protocol with superior battery life and signal resilience isn’t an upgrade; it’s a baseline requirement.
The Insurance Discount for IoT Leak Detectors Most Owners Miss
A smart water sensor system isn’t just an expense; it’s an investment with a direct, calculable return. Many homeowners are unaware that insurance companies, who lose billions to water damage claims annually, are actively incentivizing the adoption of this technology. By installing a qualifying leak detection system, you are demonstrating proactive risk management, and insurers are willing to reward you for it. The discounts are substantial, but they are rarely offered automatically—you have to ask for them and provide the correct documentation.
The most significant savings are typically linked to systems that include an automatic water shut-off valve, but even basic detection sensors can qualify for a discount. Leading major insurance providers now offer a 5-20% reduction in premiums for homes equipped with these systems. On a $2,500 annual premium, that’s a savings of up to $500 per year, meaning a professional system can pay for itself in just a few years. It transforms a safety device into a cash-flow-positive asset.

To claim your discount, you must follow a specific process. It starts with choosing a device approved by your carrier and often requires professional installation. Once installed, you must meticulously document the system—taking photos, saving receipts, and obtaining a verification letter from the manufacturer—and submit this package to your agent. This simple act of documentation is what separates homeowners who get the discount from those who don’t.
Action Plan: How to Secure Your Insurance Discount
- Identify Approved Devices: Contact your insurance agent and request their specific list of approved water leak detection and shut-off systems. Brands are not interchangeable.
- Collect Installation Proof: If professional installation is required, keep the plumber’s invoice. For any installation, take clear photos of the installed sensors and main shut-off valve.
- Gather Official Documentation: Download the device’s specification sheet and request an Insurance Verification Letter or certificate from the manufacturer.
- Submit a Formal Request: Send an email to your agent with all documents attached (receipt, photos, spec sheet, certificate) and formally request the “protective device discount” be applied to your policy.
- Confirm and Verify: Check your next policy statement to ensure the discount has been applied correctly. Follow up immediately if it’s missing.
This isn’t just about saving money; it’s about being recognized as a lower-risk client, which can have long-term benefits for your relationship with your insurer.
How to Link Your Sensor to an Automatic Water Main Shut-Off Valve?
Detection is the first step, but automated response is the ultimate protection. An automatic water main shut-off valve is the final piece of the puzzle, transforming your system from a passive alert network into an active defense mechanism. When a sensor detects a leak, it doesn’t just send you a notification; it sends a command to the valve, which physically closes the main water line to your entire home, stopping a leak in seconds. This can be the difference between a small puddle and a multi-room flood, especially if a leak occurs while you’re away or asleep.
The central decision is whether to tackle this as a DIY project or hire a licensed plumber. While integrated systems like Moen Flo or Phyn Plus are designed for professional installation, more adventurous homeowners can pair individual sensors with a separate valve controller. This requires some plumbing skill—specifically, cutting into your main water line—and basic low-voltage wiring. The primary benefit is cost savings, but the risk is significant. An improperly installed valve can become a new source of leaks, negating the entire purpose of the system.
For most homeowners, especially those whose primary motivation is risk reduction, professional installation is the pragmatic choice. It guarantees the work is done to code, preserves the product warranty, and, most importantly, ensures you will qualify for the maximum insurance discount. The decision matrix below outlines the key trade-offs.
| Factor | DIY Installation | Professional Installation |
|---|---|---|
| Cost | $300-500 (valve + sensors) | $1,500-2,500 total |
| Required Skills | Pipe cutting, soldering, basic wiring | None required |
| Time Investment | 4-8 hours | 2-3 hours |
| Insurance Compliance | May not qualify for discounts | Guaranteed compliance |
| Warranty | Parts only | Parts + labor |
| Risk of Failure | Higher – potential flooding if done incorrectly | Lower – professional liability coverage |
Ultimately, paying a professional is often a small premium for the guaranteed performance and peace of mind that a critical safety system demands.
How to Predict Washing Machine Failure Before It Floods Your Floor?
While sensors are excellent for detecting failures, a truly proactive strategy involves recognizing the warning signs an appliance gives off long before it fails catastrophically. The washing machine is a primary culprit for major home floods. A burst supply hose can release water at a rate of 50 gallons per minute, turning a laundry room into a swimming pool in the time it takes to run a quick errand. The number one point of failure is the standard-issue rubber hoses, which degrade, bulge, and eventually burst under constant pressure.
Your first, most crucial action is to replace these rubber hoses with braided steel hoses. This is a $20 investment that prevents a potential five-figure disaster. Beyond the hoses, you need to learn to read the subtle signs of impending failure. These are the “pre-leak” indicators that your machine is under stress.
Start by looking for physical evidence. Small rust spots on the floor or faint mineral deposits on the wall behind the machine are definitive signs of a tiny, intermittent leak that is already occurring. Pay attention to the machine’s behavior: does it “walk” or vibrate violently during the spin cycle? This indicates a failing suspension, which puts immense stress on all internal connections and hoses. A persistent musty smell, even when the machine is empty and dry, points to trapped water from a failing door seal or a slow internal leak. These aren’t minor annoyances; they are urgent calls for inspection.
- Braided Steel Hoses: Replace rubber hoses immediately. This is the single most important preventative step.
- Visual Inspection: Regularly check for rust or mineral deposits on the floor and wall behind the unit.
- Vibration Monitoring: A machine that “walks” during the spin cycle has a failing suspension, which is a major risk factor.
- Odor Investigation: A persistent musty smell is a red flag for a slow, hidden leak inside the machine.
- Digital Stethoscope: For the tech-savvy, a humidity sensor placed behind the machine can act as a “digital stethoscope.” The humidity should spike during use and return to baseline within 30 minutes. A sustained high reading indicates a slow leak.
By combining physical inspection with smart sensor monitoring, you create a layered defense that can catch almost any potential failure before it becomes a claim.
Repair or Replace: What the Data Says About Appliances Over 7 Years Old?
As appliances age, they transition from reliable workhorses to ticking time bombs. Failures are not a matter of “if” but “when.” From an adjuster’s perspective, water damage and freezing now account for 22.6% of all home insurance claims, with aging appliances being a primary driver. The pragmatic homeowner must therefore have a data-driven framework for deciding when to repair a failing appliance versus replacing it preemptively. The “50% rule” is a common guideline: if a repair costs more than 50% of the price of a new appliance, replace it. However, this rule is incomplete because it ignores the massive potential cost of water damage.
A more accurate calculation must include the “risk-adjusted cost.” For a 10-year-old washing machine, a $300 repair might seem reasonable compared to a $1,000 replacement. But if the annual failure rate for that model is 15% and the average flood damage is $5,000, the true risk-adjusted cost of keeping it is much higher. You are not just betting the repair cost; you are betting against a potential catastrophe. For any water-connected appliance over seven years old, replacement should be the default consideration over repair.
This risk-based approach should guide your home maintenance strategy. A water heater over eight years old needs a leak detector and a drain pan immediately, with a replacement planned within two years. A refrigerator’s plastic ice maker line is a notorious failure point and should be replaced with braided steel after five years. These aren’t upgrades; they are essential risk mitigation tasks based on hard data about appliance life cycles.
Your Home Water Risk Audit Checklist
- Leak Hotspots: Walk through your home and list every potential failure point: under sinks, behind toilets, water heaters, washing machines, dishwashers, and refrigerators with ice makers.
- System Inventory: For each of those appliances, find and record its age (from the serial number or purchase receipt). This is your risk baseline.
- Risk Alignment: Compare each appliance’s age against its typical lifespan (e.g., water heater: 8-12 years, washing machine: 10-13 years). Any appliance in the final 25% of its lifespan is a high-risk asset.
- Signal Integrity: If you have sensors, test them now. Confirm the alert is loud, immediate, and sent to all necessary contacts (you, your spouse, a trusted neighbor). An alert no one hears is useless.
- Action Plan: Create a prioritized schedule. Task #1: Replace all rubber washing machine hoses with braided steel. Task #2: Plan the replacement of any high-risk appliance identified in your audit.
Treating appliance replacement as a scheduled, budgeted event rather than an emergency response is the hallmark of a financially savvy and secure homeowner.
Key takeaways
- The greatest financial risk isn’t a sudden flood, but a slow, corrosive leak that insurance often won’t cover due to “gradual damage” exclusions.
- A reliable sensor network uses a mesh protocol like Z-Wave for superior battery life and signal penetration in difficult areas like basements.
- Documenting your sensor or automatic shut-off valve installation can lead to insurance premium discounts of 5-20%, providing a direct return on investment.
Home Care vs Nursing Home: How to Make the Right Choice for Mom?
At first glance, this question seems out of place in a discussion about water sensors. But as an adjuster, I see the profound connection: a home is more than a place to live; it’s a primary financial asset. For many families, the equity in a parent’s home is the very resource that will fund their future care, whether it’s in-home assistance or a residential facility. Protecting that asset from a catastrophic loss is paramount. A single, major water damage event can wipe out tens of thousands of dollars in home value, directly impacting the quality and duration of care you can afford for a loved one.
This perspective reframes home maintenance as an essential part of long-term family financial planning. As the Insurance Information Institute notes, asset preservation is a critical, yet often overlooked, component of preparing for elder care needs. This is where modern technology provides a powerful new form of assurance.
Protecting a home from water damage isn’t just about avoiding repair bills; it’s about preserving a primary family asset. A well-maintained home holds its value, which can be critical for funding future care or being passed down as an inheritance.
– Industry Analysis, Insurance Information Institute Report on Property Protection
Furthermore, these systems can provide a secondary benefit: indirect wellness monitoring. Smart shut-off systems that track water flow can provide peace of mind for families caring for an elderly parent living alone. An unusual pattern—like a toilet running for hours or no water usage at all during a typical morning—can trigger an alert for the adult children, prompting them to check in. This dual-purpose monitoring protects both the property and, more importantly, the parent.
Case Study: Remote Monitoring Provides Peace of Mind for Families
After their insurance premiums doubled, a Dallas family installed a Moen Flo smart shutoff system in their elderly parent’s home. The system now sends alerts to the adult children’s phones when unusual water flow is detected. One night, the system detected a toilet running at 2 AM. This prompted a call, which led the family to discover their parent had fallen and needed assistance. The user described the dual benefit of property and parent protection as delivering ‘priceless peace of mind’.
Investing in a system that protects the home’s value is, in effect, a direct investment in your family’s future security and your own peace of mind.