The secret to effective, budget-friendly track braking isn’t buying expensive parts; it’s correctly diagnosing your system’s single weakest link—usually fluid or pads—and making a targeted upgrade.
- Brake fade is not one problem, but several (fluid, pad, knock-back) requiring different solutions.
- A cheap set of dedicated track pads will always outperform expensive ceramic street pads on track.
Recommendation: Before buying any hardware, invest in a bottle of high-temperature DOT 4 brake fluid and have your system professionally flushed. This is the highest-impact, lowest-cost upgrade you can make.
You’re three laps into your first track day. You’ve been building speed and confidence, nailing your lines, and feeling the car connect with the circuit. You head into a heavy braking zone, press the pedal, and… it sinks towards the floor with a terrifying lack of response. This is brake fade, the moment your brakes effectively give up. The common advice is to throw money at the problem: big brake kits, multi-piston calipers, and two-piece rotors. But as a track instructor, I can tell you this is usually the wrong approach for an amateur on a budget.
The real path to reliable, powerful brakes isn’t about a total overhaul. It’s about understanding the system, identifying its true thermal limits, and making surgical, cost-effective upgrades. The issue is rarely a lack of absolute clamping force. The problem is almost always heat management. Your stock calipers are likely powerful enough, but the system as a whole can’t shed the immense thermal energy generated lap after lap. Forget the expensive catalogs for a moment. The most significant gains in stopping power and consistency come from addressing the weakest links first: your brake fluid and pads.
This guide will walk you through the diagnostic mindset of a seasoned racer. We will ignore the marketing hype and focus on the physics of what’s happening in your braking system. You will learn to identify the specific type of fade you’re experiencing, understand the critical trade-offs between different pad compounds, and see why the cheapest, most effective upgrades are often the ones people overlook. By the end, you’ll have a clear, prioritized plan to build a braking system that’s safe, consistent, and won’t destroy your wallet.
To help you navigate these critical upgrades, we’ve structured this guide to address the most common points of failure and confusion. This will give you a step-by-step framework for building a track-ready braking system on a realistic budget.
Contents: How to Upgrade Your Braking System for Track Days on a Budget?
- Why Your Brakes Stop Working After 3 Laps on the Track?
- How to Choose Between Ceramic and Semi-Metallic Pads for Daily Driving?
- DOT 4 vs DOT 5.1:Why Is It So Hard to Stop Scrolling Social Media at Night?
- The Brake Balance Error That Can Cause Rear-End Spinouts
- When to Flush Brake Fluid: The Color Test You Can Do at Home
- The Ebay Parts Risk That Can Cause Catastrophic Suspension Failure
- The Blind Spot Error New Cyclists Make in City Traffic
- How to Add Downforce to Your Car Without Destroying Fuel Economy?
Why Your Brakes Stop Working After 3 Laps on the Track?
That heart-stopping moment when the brake pedal goes soft is almost always due to heat overwhelming a component. The key is to diagnose which part failed. “Brake fade” is a generic term for several distinct failures. Understanding the difference is the first step in a smart upgrade path. The primary culprits are your brake fluid and your brake pads. Each fails in a very different way, giving you clear symptoms to look for.
Fluid fade occurs when your brake fluid boils, creating compressible gas bubbles in the lines. The symptom is a long, soft, spongy pedal that may go nearly to the floor. Your stock fluid has a low boiling point, which can be exceeded after just a few minutes of hard track use. Pad fade is different. It happens when the resin compounds in the pad material overheat and outgas, creating a lubricating layer of gas between the pad and the rotor. The symptom here is a firm, solid pedal, but the car simply doesn’t slow down. You’re pressing hard, but getting no bite. A third, more subtle issue is pad knock-back, where flex in the wheel hub assembly actually pushes the caliper pistons back into their bores. The first time you hit the brakes after a high-G corner, the pedal will travel a long way before the pads make contact with the rotor. A quick second tap, or “pump,” on the pedal will usually bring back a firm feel. Distinguishing between these is critical: a fluid problem requires better fluid, while a pad problem requires better pads.
Case Study: The Mondello Park Race Fleet Brake Setup
To see this principle in action, look no further than the training fleet at Mondello Park, a major Irish race circuit. Their fleet of Mazda 3 training cars endures constant abuse from novice drivers all year. Despite having full race modifications like roll cages, their braking systems remain surprisingly simple. They use the standard calipers and rotors, but upgrade to Mintex ‘track day spec’ pads. This single change is enough to provide consistent, reliable braking under punishing conditions. Their higher-performance Porsche fleet uses the same strategy: a pad upgrade combined with high-performance racing brake fluid. This proves that for most cars, you don’t need a “big brake kit”; you need components that are thermally capable.
How to Choose Between Ceramic and Semi-Metallic Pads for Daily Driving?
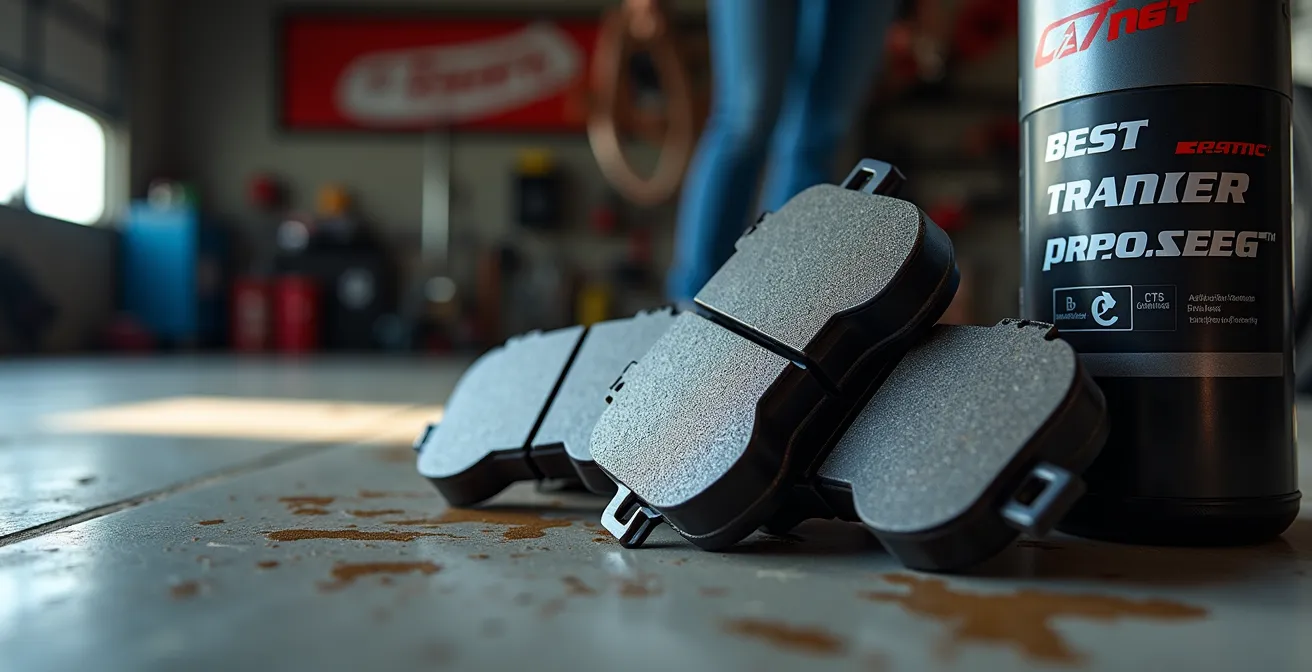
When considering a brake upgrade, the first and most impactful choice is the pad compound. While the title mentions daily driving, for a track-focused budget build, the question shifts. You aren’t just choosing between ceramic and semi-metallic; you are choosing between pads designed for the street and pads designed for the track. Their operating characteristics are fundamentally different. Ceramic pads are excellent for daily driving: they are quiet, produce very little dust, and have a great “cold bite,” meaning they work effectively from the first stop. However, their materials are not designed to handle the extreme temperatures of a racetrack and will fade very quickly.
Semi-metallic pads offer a better compromise, providing good heat resistance, but they come with more noise and significantly more dust. For a car that sees both street and track use, a high-performance hybrid pad can be a good solution. But for maximum safety and performance on track, a dedicated track day compound is the only correct choice. These pads have a poor cold bite, can be extremely loud, and generate massive amounts of corrosive dust. Their key advantage is their immense fade resistance. They are designed to work best when extremely hot, providing consistent, powerful braking lap after lap. As racing expert Jack Baruth of Road & Track states:
A cheap track pad will outperform an expensive ceramic street pad on track every time.
– Jack Baruth, Road & Track – Everything You Need to Know About Brakes and Track Days
This single statement is the most important lesson in budget brake upgrades. Your money is far better spent on a $150 set of track pads you swap in for race weekends than on a $100 set of high-end ceramic pads that will fail under pressure.
This table illustrates the critical trade-offs between different pad types. For a track car, “Fade Resistance” is the most important column; for a street car, “Noise Level” and “Dust Production” are often priorities.
| Pad Type | Cold Bite | Fade Resistance | Noise Level | Dust Production | Rotor Wear | Price Range |
|---|---|---|---|---|---|---|
| Ceramic Street | Excellent | Poor | Very Quiet | Low | Low | $40-80 |
| Semi-Metallic | Good | Good | Moderate | High | Moderate | $30-60 |
| Hybrid/High-Performance Street | Good | Very Good | Moderate | Moderate | $60-120 | |
| Track Day Compound | Poor | Excellent | Loud | Very High | High | $150-300 |
DOT 4 vs DOT 5.1:Why Is It So Hard to Stop Scrolling Social Media at Night?
Ignoring the last part of that title, let’s focus on the critical choice of brake fluid. If your on-track diagnosis points to a spongy pedal (fluid fade), upgrading your brake fluid is the single most important and cost-effective upgrade you can make. Brake fluid is hygroscopic, meaning it absorbs water from the atmosphere over time. Water has a much lower boiling point than brake fluid (212°F / 100°C). As the water content in your fluid increases, its overall boiling point—known as the “wet boiling point”—plummets, making fluid fade far more likely.
The “DOT” rating indicates the fluid’s minimum boiling points. While DOT 5.1 has a slightly higher boiling point than DOT 4 on paper, it is also more hygroscopic, meaning it absorbs water faster. For a budget-conscious track build, a high-quality DOT 4 fluid is often the smarter choice. Racing-specific DOT 4 fluids like Motul RBF 600 or Castrol SRF are engineered for thermal stability, where high-performance DOT 4 racing fluids achieve a dry boiling point of 600-650°F, which is more than enough for most amateur track use. The key is freshness. A fresh bottle of quality DOT 4 will always outperform a year-old bottle of DOT 5.1 that has absorbed moisture. Another crucial upgrade to consider in tandem with fluid are your brake lines. Old, soft rubber lines can bulge under the high pressures of track braking, contributing to a spongy pedal feel. Upgrading to stainless steel braided lines prevents this expansion, ensuring all your pedal effort goes directly to clamping the rotors. This provides a firmer, more responsive pedal and is a foundational upgrade for any track car.
To make an informed decision, follow these guidelines:
- Focus on Freshness: Old, moisture-laden DOT 5.1 is worse than fresh DOT 4. Flush your system with a newly opened bottle before every season or major event.
- Understand the Trade-Off: DOT 5.1’s higher performance comes at the cost of faster water absorption, requiring more frequent fluid changes.
- Address the Weakest Link First: If you have soft rubber lines, upgrading them to stainless steel will provide a more noticeable improvement in pedal feel than switching from a quality DOT 4 to DOT 5.1.
The Brake Balance Error That Can Cause Rear-End Spinouts
Once you’ve addressed heat management with proper fluid and pads, you must consider the system’s dynamics. Brake balance, or bias, refers to the distribution of braking force between the front and rear wheels. Because weight transfers forward under deceleration, the front brakes must do significantly more work. As a result, most RWD street vehicles maintain a 60-70% front bias to prevent the rear wheels from locking up prematurely. A rear-wheel lock-up is extremely dangerous as it can cause the car to spin out uncontrollably.
This balance can be dangerously upset by mismatched upgrades. A common mistake is installing aggressive track pads on the front axle while leaving standard street pads on the rear. The front brakes will now have a much higher coefficient of friction, exacerbating the forward weight transfer and potentially overloading the front tires while the rear brakes do very little work. A more dangerous scenario is the reverse: upgrading the rear brakes more aggressively than the front. This can shift the bias too far to the rear, making the car prone to spinning under hard braking, especially during trail-braking into a corner.
The goal of a balanced setup is to have the front wheels lock up just slightly before the rears in a maximum-effort stop. This results in a stable, straight-line stop. Professional racers have a simple diagnostic for this:
Diagnosing Brake Bias Like a Pro
In a safe, open area, perform a hard stop that induces wheel lock-up. If the car pulls straight as the tires lock and screech, it means the front wheels are locking first. This is the “safe” mode of failure, as the car remains stable. If, however, the rear of the car feels light, “twitchy,” or wants to step sideways as the wheels lock, it’s a clear sign the rear wheels are locking first. This is a dangerous condition that must be rectified before any high-performance driving. Correcting this might involve switching to a less aggressive pad in the rear or a more aggressive pad in the front to shift the bias forward again.
When to Flush Brake Fluid: The Color Test You Can Do at Home
The title suggests a simple “color test,” but this is one of the most persistent and dangerous myths in auto maintenance. Brake fluid color is not a reliable indicator of its condition. Fluid can be almost perfectly clear and still be saturated with enough water to drastically lower its boiling point. The dark color in old fluid is often just degraded additives or microscopic debris; it doesn’t directly correlate with water content, which is the true enemy of braking performance.
Instead of relying on color, maintenance should be based on a strict schedule and, if possible, empirical testing. For a car that sees track time, the rule is simple: flush the brake fluid annually at a minimum, or after every 3-4 track days, whichever comes first. For serious competitors, many will flush the fluid before every single race weekend to ensure maximum performance and safety. A proper brake fluid flush represents only a $50-60 investment in fluid and labor (or just the cost of fluid if you do it yourself), making it an incredibly cheap piece of insurance against brake failure.
For a more scientific approach, you can purchase an electronic brake fluid tester for around $15. This tool measures the electrical conductivity of the fluid, which directly correlates to its water content. Most experts recommend a flush if the water content exceeds 2-3%. This evidence-based approach removes all guesswork from your maintenance schedule and ensures your fluid is always in optimal condition. Relying on a visual test is a gamble you cannot afford to take on a racetrack.
Action Plan: Your Annual Brake System Health Audit
- Points of Contact: On a test drive, listen for grinding noises and feel for pulsations or sponginess in the brake pedal. These are the first signals of wear.
- Collect Data: Inventory your system. Note the brand and age of your pads, the date of your last fluid flush, and visually inspect rotor surfaces for cracks or heavy scoring.
- Check Coherence: Does your equipment match your use case? If you’re doing more than two track days a year on stock fluid, you have a coherence problem.
- Evaluate Feel: Does the brake pedal inspire confidence? A firm, high pedal is a sign of a healthy system. A soft, long-travel pedal indicates a problem (air, old fluid, or failing master cylinder).
- Plan Integration: Based on your audit, prioritize the weakest link. For most novice track drivers, the highest-priority action is a professional brake fluid flush with a high-temp DOT 4 fluid.
The Ebay Parts Risk That Can Cause Catastrophic Suspension Failure
While the title highlights suspension, the risk of using unverified, second-hand parts is even more acute when it comes to your braking system. A suspension failure can be dangerous, but a total brake failure at speed is almost guaranteed to be catastrophic. The allure of cheap parts on platforms like eBay is strong, but many of these are counterfeit, damaged, or have an unknown history, making them a massive gamble. A “great deal” on a used caliper could be a part that was removed from a crashed vehicle, suffering from internal damage that isn’t visible from the outside.
The core of the problem is heat cycles and stress. Brake components are designed to wear out. Rotors develop micro-cracks from repeated heating and cooling. Pads are consumed with every stop. Caliper seals harden and degrade over time. Buying used means you have no idea how much life is left in these components. A used rotor might look fine, but it could be warped or have just one track day left before it cracks. Counterfeit parts are an even greater danger. They may look identical to genuine parts but are often made from inferior materials with poor quality control, leading to failures under pressure.
The following risk matrix should be your guide when shopping for parts. Some components are low-risk, but safety-critical items should never be purchased used.
This image highlights the visual difference between a high-quality, genuine brake component and a low-quality counterfeit. Notice the rough, porous surface on the counterfeit part versus the smooth, precisely machined finish on the authentic one. These subtle defects can lead to catastrophic failure under the stresses of track driving.
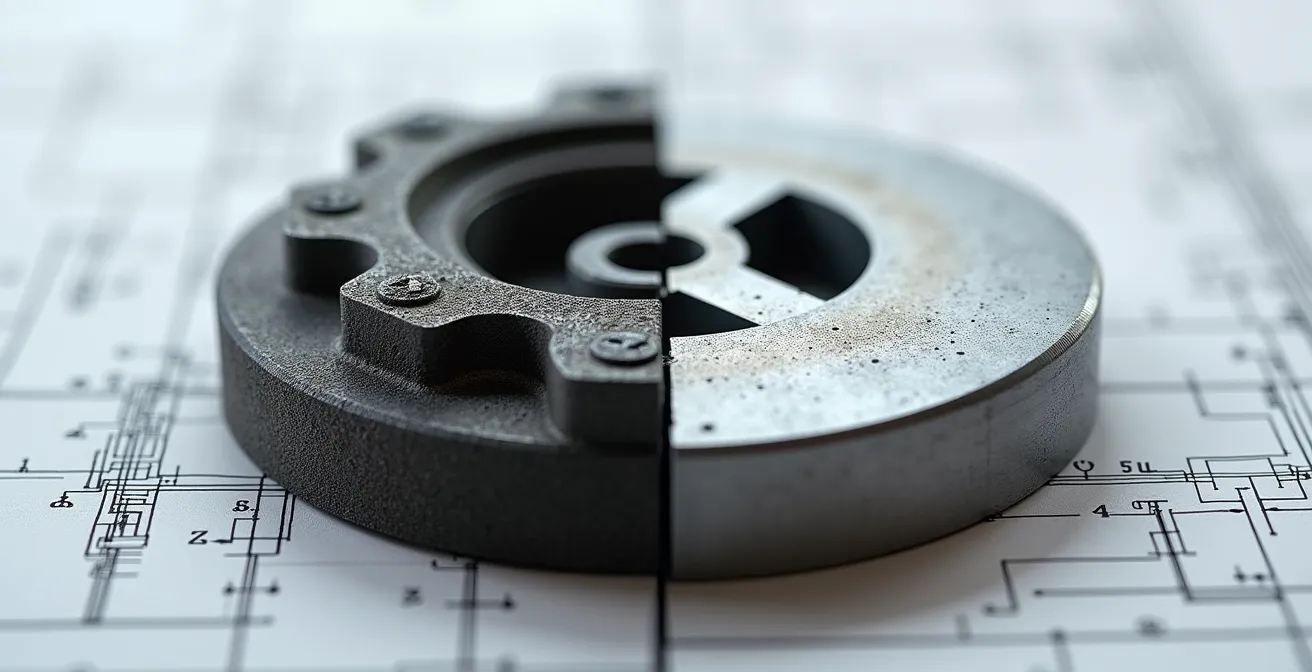
As you can see, the quality of the materials and manufacturing process is paramount. Given the relatively low cost of new budget rotors and pads, the savings from buying used simply do not justify the enormous safety risk.
| Part Category | Risk Level | Common Issues | Recommendation |
|---|---|---|---|
| Brake Rotors | Never Buy Used | Heat stress cracks, unknown heat cycles, warping | Buy new – budget rotors only $50-60 each |
| Brake Pads | Never Buy Used | Unknown heat cycles, potential glazing, contamination | Always buy new – safety critical |
| Used Calipers | Medium Risk | Seized pistons, weeping seals, internal corrosion | Only from reputable source, plan to rebuild |
| Caliper Carriers | Low Risk | Mainly cosmetic wear | Acceptable if properly inspected |
| Brake Lines | Never Buy Used | Internal degradation, swelling, micro-cracks | New stainless lines under $100 |
The Blind Spot Error New Cyclists Make in City Traffic
The biggest blind spot for a novice track driver isn’t a car hiding next to them; it’s the component that fundamentally connects their entire braking system to the pavement: the tires. Drivers often get obsessed with upgrading calipers, rotors, and pads, forgetting that a brake’s job is simply to stop the wheel from turning. The actual deceleration of the car is handled entirely by the friction between the tire and the track surface, a space known as the contact patch.
You can install an $8,000 carbon-ceramic brake system, but if you are running on old, hardened, all-season tires with no grip, your stopping distances will not improve. The brakes will easily lock the wheels, the ABS will kick in frantically, and the tires will simply slide over the asphalt. As the technical team at UMI Performance wisely puts it:
A $2,000 Big Brake Kit on old, hardened all-season tires is a complete waste of money. The car’s stopping power is ultimately limited by the tire’s contact patch.
– UMI Performance Technical Team, How to Go Racing Without Going Broke
This is the ultimate “weakest link” in the system. Before spending a single dollar on brake hardware, evaluate your tires. A fresh set of performance summer tires (or dedicated track tires) will do more to shorten your braking zones than any brake upgrade alone. Furthermore, many braking “problems” are actually issues with other baseline maintenance items. A vibration under braking might not be a warped rotor, but a seized caliper slide pin causing uneven pad wear. A soft pedal might not be fluid fade, but a sticky caliper piston that isn’t retracting properly. Before you upgrade, you must ensure your existing system is in perfect working order.
- Caliper Slide Pins: Inspect and lubricate all caliper slide pins. Seized pins are a common cause of uneven pad wear and braking issues.
- Caliper Pistons: Check that all caliper pistons move freely. A sticky piston can cause brake drag and overheating.
- Rotor Condition: Measure rotor thickness and check for excessive runout (warping). Thin or warped rotors have reduced thermal capacity.
- Tire Condition: Check the age (DOT code) and condition of your tires. Tires older than 5-6 years will be hardened and have significantly less grip, regardless of tread depth.
Key takeaways
- The highest-impact, lowest-cost brake upgrades are always high-temperature fluid and track-specific pads.
- Diagnose your failure mode: a spongy pedal means fluid fade, while a hard pedal with no stopping power means pad fade.
- Never buy safety-critical components like pads and rotors used. The risk far outweighs the minimal cost savings.
How to Add Downforce to Your Car Without Destroying Fuel Economy?
While aerodynamic downforce is a fascinating topic for improving cornering grip, it’s an expensive and complex path. For the budget-conscious track driver looking to improve braking, a far more direct and affordable strategy is to improve brake cooling. The enemy on track is heat; therefore, any effort to remove that heat from the system will directly translate into more consistent and powerful braking, lap after lap. You don’t need a massive wing; you need airflow.
Many production cars are designed with aerodynamics that prioritize fuel economy, often meaning that potential air inlets for brake cooling are blocked off from the factory. Opening these up is a free modification that can immediately improve performance. For a more significant effect, you can create a dedicated brake cooling solution. This involves running flexible, high-temperature ducting from an opening in the front bumper or lower valance directly to the brake assembly. The goal is to direct a constant stream of cool, high-pressure air onto the brake rotor, helping it shed heat more efficiently between braking zones.
This doesn’t have to be an expensive, custom-fabricated job. Many effective solutions can be implemented for less than $50.
DIY Brake Cooling Solutions That Work
A common and effective DIY method involves removing the factory fog lights (if equipped) and using those openings to route air. You can then use high-temperature silicone ducting, similar to what’s used for dryers but rated for higher heat, to channel that air toward the hub area. On many popular track cars like the Mazda Miata or BMW 3-Series, you can even find 3D-printable files online for custom backing plates that replace the stock dust shield and have a built-in nozzle for the cooling duct. This ensures the air is aimed precisely at the center vanes of the rotor for maximum cooling effect. This simple modification can be the difference between having consistent brakes for an entire session and experiencing fade after just a few laps.
Start by flushing your system with high-quality DOT 4 fluid and installing a set of dedicated track pads. Once you’ve experienced the transformative effect of those two changes, you can then apply this diagnostic mindset to identify the next weakest link in your car’s system, ensuring every dollar you spend is a smart investment in safety and speed.